Build a Work Queue Slackbot with Temporal in Typescript
Introduction
A Slash Command Slack App enables Slack users to interact with an application using a Slash Command (/<command>) in a Slack channel.
Slash Commands don't pollute Slack channels with messages and default to messages only visible to the user who initiated the command.
This makes them ideal for Slack Channel add-on functionality.
When you're creating a Slash Command Slack App, you might need to persist data between interactions. Traditionally, you would connect directly to a database to do this. With a Temporal Application, you can persist that data directly within a function that's resilient to process crashes and can be horizontally scaled.
By the end of this tutorial, you will be able to create a Slash command Slack App that responds to interactive block elements. You will be able to implement an "entity" pattern Temporal Workflow using the Temporal TypeScript SDK to manage the state of your Slack App without a traditional database. You will gain experience sending and handling application messages, such as Signals and Queries. And, you will gain experience sending and handling business process Cancellation requests, and use the Continue-As-New feature. When you're finished, you will have a fully functioning Slack App deployable to a production environment without the need for a traditional database.
Prerequisites
Before starting this tutorial Set up a local development environment for Temporal and TypeScript.
Review or complete the Run your first Temporal application with the TypeScript SDK tutorial to get a basic understanding of how Temporal works.
Overview of the application
Before you start building, take a moment to understand the application and its requirements.
Use case
What's the use case for the application you're building?
You are building a Work Queue Slack App.
Imagine an organization with dozens and dozens of teams. Each team provides a service to the organization, and each team has a Slack channel. While there may be a common task tracking system in place, there are often many micro tasks that don't warrant a full task in the task tracking system. For example, an engineer may need a review on a Pull Request from another team they're integrating services with. Often these micro task requests come through Slack conversations. Each team might have a dedicated on-call person responsible for handling these requests. On a busy day, it could be possible to lose track of all the requests in the Slack channel. It would be nice to have a standard way for folks to submit requests and for the on-call person to manage them.
The application you are building today is a Slash command Slack App to submit and manage general "work" requests in a Slack channel.
System architecture
What are the components of the system and how are they arranged?
The system consists of a Slack Workspace, a Slack App, a Temporal Service, and a Temporal Application.
Traditionally, you would need a database to persist the state of your Slack App between interactions in case the Slack App process crashes or goes down. If you use Temporal, you can persist the state of your Slack App directly within a Temporal Application.

The preceding diagram abstracts Slack's back end as a communication channel between the Slack App and the Slack Workspace. The diagram could also abstract the Temporal Service as a communication channel. However, for folks learning Temporal, it's helpful to understand that the Temporal Service is a separate service from the Temporal Application.
Is trading off a database for Temporal worth it?
Setting up and managing your database can be more overhead. During the development process instead of a managing a database, you will run a Temporal Service locally alongside your Temporal Application. You should already have it running if you completed the Prerequisite steps. So, during development it will seem like you're managing two things instead of one.
However, after the development process, if you use Temporal Cloud as your Temporal Service, you only need to deploy the Temporal Application the same way as you would your Slack App. Then, your Temporal Application replaces an entire database with less than 70 lines of code.

To use Temporal Cloud in production, see the Deploy your TypeScript application to Digital Ocean tutorial for more information.
Functional requirements
What are the functional requirements of the application?
- Using a Slash command, a user can submit a work request.
- Using a Slash command, a user can see all the work requests for the channel.
- When viewing all the work requests for the channel, a user can click a button to claim a work request.
- When viewing all the work requests for the channel, a user can click a button to mark a work request as complete.
- Using a Slash command, a user can delete the Work Queue for the channel.
Step 1 -- Create a new Slack App configuration
Go to https://api.slack.com/apps?new_app=1 and create an app "From scratch." Name the app whatever you want, and select a workspace that you intend to install it to.
Once you've done this, click "Create App."
Enable Socket Mode
Under Settings in the navigation bar, select Socket Mode and toggle ON socket mode for this application.

When you enable Socket Mode, Slack gives you an application token that you will need when you start the app.
This token will typically start with xapp.
It is located under App-Level Tokens in Basic Information.
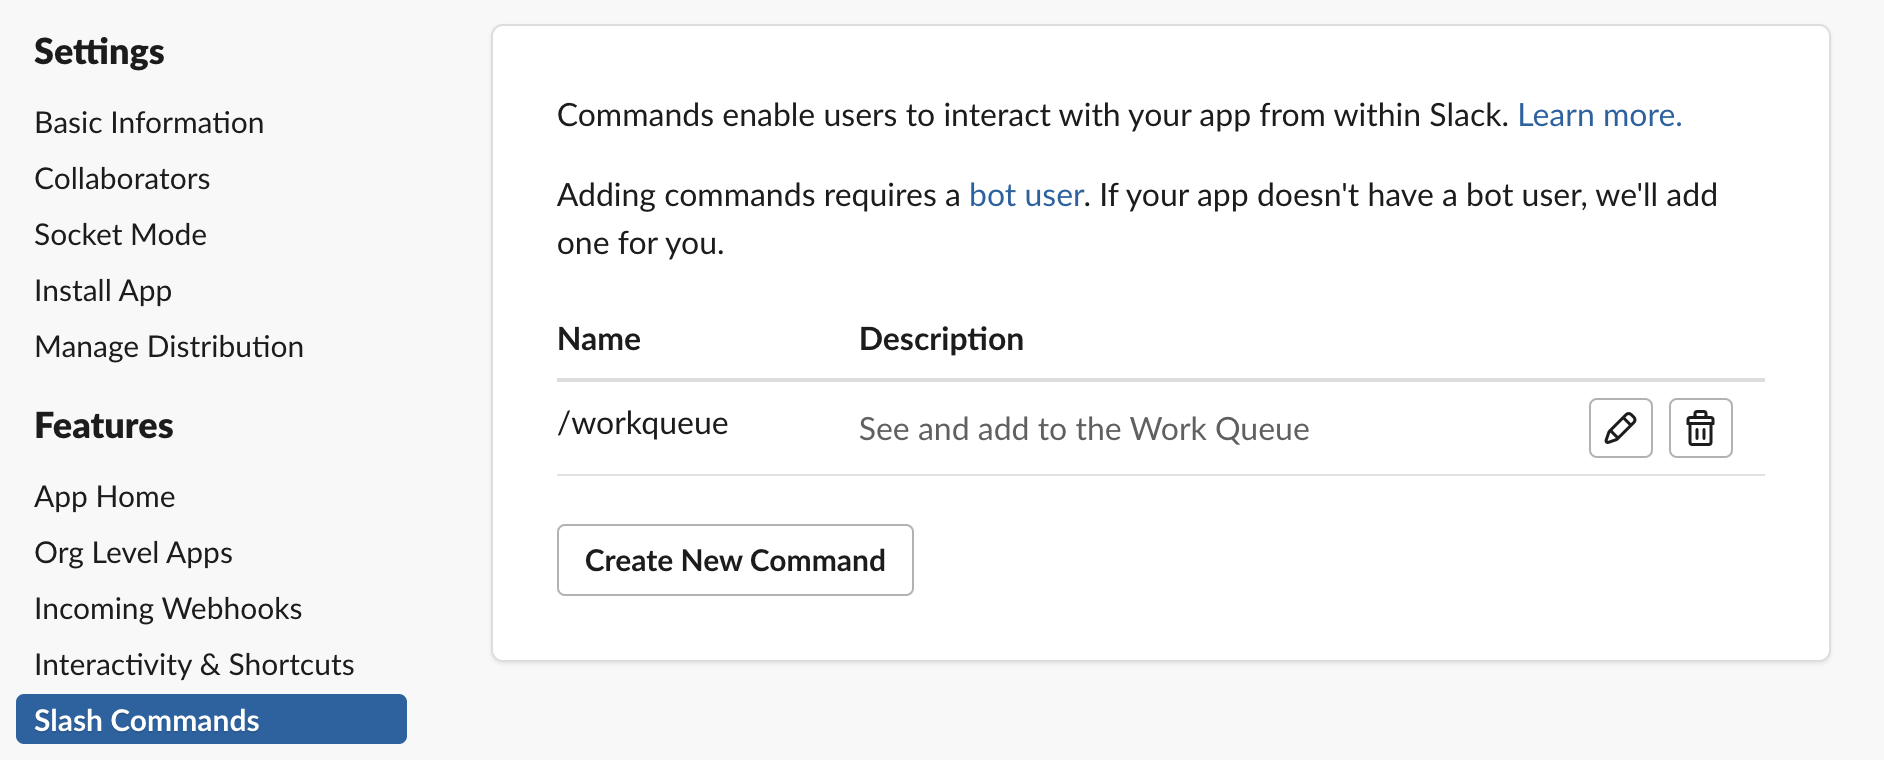
Create a Slash Command
Select "Slash Commands" in the sidebar navigation, and click "Create New Command".
Add a new command for /workqueue.
Since you have Socket Mode enabled, you won't need to add a request URL.
Subscribe to Events
Under Features in the navigation bar, select Event Subscriptions and ensure Enable Events is turned ON. Then navigate to the section under "Subscribe to bot events" and add subscriptions for:
message.groupsmessage.immessage.channels
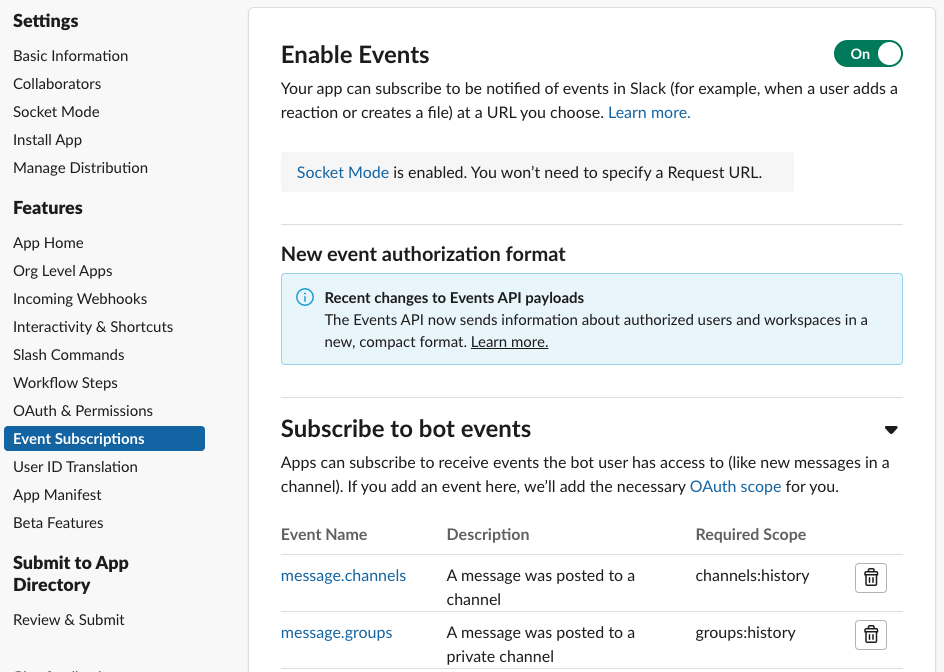
Once you've done this, click "Save Changes"
Set OAuth & Permissions
Under Features in the navigation bar, go to OAuth & Permissions.
You'll need to enable the following Bot Token Scopes:
channels:historychannels:readchat:writegroups:historygroups:readim:historympim:history
Install App
After you've done this, install the app in Slack by going to Install App under Settings in the navigation bar.
Get credentials
You will need Signing Secret and App Level Token from the Basic Information page. You will also need the Bot User OAuth Token from the Install App page, which is also available on the OAuth & Permissions page. Record all of these strings for now so you can use them to configure your app later.
Step 2 -- Create TypeScript Projects for the Slack App
You need two TypeScript projects for this Slack application.
The first of these can just be named temporal-application.
If you recently completed the Set up a local development environment for Temporal and TypeScript tutorial, you can reuse that project structure.
The other project should be called bot.
You can create a new TypeScript project for the bot by running the following commands in your terminal:
mkdir bot
cd bot
npm init
tsc --init
Those commands create a new directory for the bot project, initialize a new npm project, and create a new tsconfig.json file for TypeScript.
This tutorial assumes that your TypeScript projects are organized like this:
-- your-workqueue-slack-app
  |-- temporal-application # This is the Temporal Application project
  |   |-- .env
  |   |-- src
  |   |   |-- workflows
  |   |   |   |-- workqueue.ts
  |   |   |-- index.ts
  |   |-- package.json
  |   |-- tsconfig.json
  |-- bot # This is the Slack bot project
  |   |-- .env
  |   |-- src
  |   |   |-- index.ts
  |   |-- package.json
  |   |-- tsconfig.json
  |-- common-types # These types are shared by both projects
      |-- types.ts
Install project dependencies
Temporal Application dependencies
In the temporal-application project, you will need the following dependencies in your package.json:
{
  // ...
  "dependencies": {
    "@temporalio/worker": "^1.10.1",
    "dotenv": "^16.1.3",
    "path": "^0.12.7"
  },
  "devDependencies": {
    "@types/node": "^20.14.7",
    "ts-node": "^10.9.2",
    "typescript": "^5.4.5"
  }
  // ...
}
You can install them with the following commands:
npm install @temporalio/worker dotenv path
npm install --save-dev typescript ts-node @types/node
Slack bot dependencies
In the bot project, you will need the following dependencies in your package.json:
{
  // ...
  "dependencies": {
    "@slack/bolt": "^3.19.0",
    "@slack/web-api": "^6.12.0",
    "@temporalio/client": "^1.7.4",
    "crypto": "^1.0.1",
    "date-fns": "^3.6.0",
    "dotenv": "^16.0.3"
  },
  "devDependencies": {
    "@types/node": "^20.14.7",
    "ts-node": "^10.9.2",
    "typescript": "^5.4.5"
  }
  // ...
}
You can install them with the following commands:
npm install @slack/bolt @slack/web-api @temporalio/client crypto date-fns dotenv
npm install --save-dev typescript ts-node @types/node
Define environment variables
Your bot application will be using your Slack tokens to authenticate.
You should not commit these to your project repository.
Instead, store them in an .env file in your project root, and add that .env file to a .gitignore file in the project root so that they will not be accidentally committed.
Slack bot environment variables
Grab the Slack credentials you got from the Slack App configuration and add them to a .env file in the bot project:
SLACK_SIGNING_SECRET="<slack-signing-secret>"
SLACK_BOT_TOKEN="<slack-bot-token>"
SLACK_APP_TOKEN="<slack_app_token>"
SLACK_WORKSPACE="<slack_workspace>"
ENV="dev"
You can find yor Slack Workspace in the URL when you are logged into Slack.
Also add your Slack Workspace and an ENV variable.
The ENV variable is prepended to the Task Queue name for your Temporal Application.
This enables you to use the same Temporal Namespace locally and in production without worrying about production Tasks getting executed on your local machine.
Temporal Application environment variables
In the temporal-application project, make sure you have a .env file and for now, just add the ENV variable:
ENV="dev"
Define common types
Create a file types.ts in the common-types directory and define a Work Item data object and its statuses:
docs/tutorials/typescript/work-queue-slack-app/code/common-types/types.ts
- TypeScript
- JavaScript
export interface WorkqueueData {
  id: string;
  timestamp: string;
  channelName: string;
  channelId: string;
  userId: string;
  work: string;
  status: WorkqueueStatus;
  claimantId?: string;
  // Add more properties as needed
}

export enum WorkqueueStatus {
  Backlog = 1,
  InProgress = 2,
  Done = 3,
}
export var WorkqueueStatus;
(function (WorkqueueStatus) {
  WorkqueueStatus[WorkqueueStatus["Backlog"] = 1] = "Backlog";
  WorkqueueStatus[WorkqueueStatus["InProgress"] = 2] = "InProgress";
  WorkqueueStatus[WorkqueueStatus["Done"] = 3] = "Done";
})(WorkqueueStatus || (WorkqueueStatus = {}));
Step 3 -- Create a Work Queue Workflow
Before you start building the Slack bot, you need to create a Temporal Workflow to persist the state of the Work Queue.
This Workflow will be long running (a business process that could live for days, weeks, or years) and any given instance of it will map directly to a specific Slack channel. This pattern is often referred to as the Entity Workflow pattern.
This is in contrast to a "Sequence pattern" where the Workflow is expected to execute a set of steps and then return. Our "Entity pattern" Workflow won't ever return except to return a "Cancellation" error when it receives a Cancellation request.

Other very common use cases for an entity pattern Workflow are:
- Customers
- Shopping carts
- Orders
- Users
In fact, depending on the goal of the business process, you might find it convenient to represent any significant long living object as an Entity Workflow. This could especially be true if that object needs to be accessed by a distributed set of services.
Craft the Entity Workflow pattern
The Temporal TypeScript SDK comes with a handy condition API.
You can use this to await on a specific condition before continuing.
In this case the Workflow awaits on a Continue-As-New suggestion from the Temporal Service. This is a suggestion to essentially create a new instance of the Workflow with a fresh Event History because the current one is too large. When we continue the Workflow as a new one, we pass the existing Work Queue data to the new Workflow instance.
docs/tutorials/typescript/work-queue-slack-app/code/temporal-application/src/workflows/workqueue.ts
- TypeScript
- JavaScript
import {
  isCancellation,
  continueAsNew,
  workflowInfo,
  condition,
  // ...
} from "@temporalio/workflow";
import {WorkqueueData} from "../../../common-types/types";
// ...
export async function workqueue(existingData?: WorkqueueData[]): Promise<void> {
  const wqdata: WorkqueueData[] = existingData ?? [];
  // ...
  try {
    // Await until suggestion to Continue-As-New due to History size
    // If a Cancellation request exists, the condition call will throw the Cancellation error
    await condition(() => workflowInfo().continueAsNewSuggested);
  } catch (e) {
    // Catch a Cancellation error
    if (isCancellation(e)) {
      // Set the Workflow status to Cancelled by throwing the CancelledFailure error
      throw e;
    } else {
      // Handle other types of errors
      throw e;
    }
  }
  await continueAsNew<typeof workqueue>(wqdata);
}
import { isCancellation, continueAsNew, workflowInfo, condition,
// ...
 } from "@temporalio/workflow";
// ...
export async function workqueue(existingData) {
  const wqdata = existingData ?? [];
  // ...
  try {
    // Await until suggestion to Continue-As-New due to History size
    // If a Cancellation request exists, the condition call will throw the Cancellation error
    await condition(() => workflowInfo().continueAsNewSuggested);
  }
  catch (e) {
    // Catch a Cancellation error
    if (isCancellation(e)) {
      // Set the Workflow status to Cancelled by throwing the CancelledFailure error
      throw e;
    }
    else {
      // Handle other types of errors
      throw e;
    }
  }
  await continueAsNew(wqdata);
}
What is also handy about the condition API is that if a Cancellation request is made to the Workflow, the condition call will throw a Cancellation error.
In the context of Temporal, the code above will create a Workflow Execution that stays running until it is explicitly told to stop.
Handle messages with the Workflow
Next, you will want to define message handlers within the Workflow. With Temporal, than means handling Signals and Queries.
Signals are a way to send data into a Workflow. Queries are a way to read the state of a Workflow.
You will use a Signal to add work to the Work Queue, a Signal to claim work, and a Signal to complete work. You will use a Query to get the current state of the Work Queue.
It is a good practice to define the Signals and Queries outside of the Workflow and handle them right after declaring local state variables within the Workflow.
docs/tutorials/typescript/work-queue-slack-app/code/temporal-application/src/workflows/workqueue.ts
- TypeScript
- JavaScript
import {
  // ...
  defineQuery,
  defineSignal,
  setHandler,
} from "@temporalio/workflow";
// ...
export const getWorkqueueDataQuery =
  defineQuery<WorkqueueData[]>("getWorkqueueData");
export const addWorkToQueueSignal =
  defineSignal<[WorkqueueData]>("addWorkqueueData");
export const claimWorkSignal =
  defineSignal<[{workId: string; claimantId: string}]>("claimWork");
export const completeWorkSignal =
  defineSignal<[{workId: string}]>("completeWork");

export async function workqueue(existingData?: WorkqueueData[]): Promise<void> {
  // ...
  // Register a Query handler for 'getWorkqueueData'
  setHandler(getWorkqueueDataQuery, () => {
    return wqdata;
  });

  // Register the Signal handler for adding work
  setHandler(addWorkToQueueSignal, (data: WorkqueueData) => {
    wqdata.push(data);
  });

  // Register Signal handler for claiming work
  setHandler(claimWorkSignal, ({workId, claimantId}) => {
    const workItem = wqdata.find((item) => item.id === workId);
    if (workItem) {
      workItem.claimantId = claimantId;
      workItem.status = 2;
    }
  });

  // Register Signal handler for completing work
  setHandler(completeWorkSignal, ({workId}) => {
    const index = wqdata.findIndex((item) => item.id === workId);
    if (index !== -1) {
      wqdata.splice(index, 1);
    }
  });
  // ...
}
import {
// ...
defineQuery, defineSignal, setHandler, } from "@temporalio/workflow";
// ...
export const getWorkqueueDataQuery = defineQuery("getWorkqueueData");
export const addWorkToQueueSignal = defineSignal("addWorkqueueData");
export const claimWorkSignal = defineSignal("claimWork");
export const completeWorkSignal = defineSignal("completeWork");

export async function workqueue(existingData) {
  // ...
  // Register a Query handler for 'getWorkqueueData'
  setHandler(getWorkqueueDataQuery, () => {
    return wqdata;
  });

  // Register the Signal handler for adding work
  setHandler(addWorkToQueueSignal, (data) => {
    wqdata.push(data);
  });

  // Register Signal handler for claiming work
  setHandler(claimWorkSignal, ({ workId, claimantId }) => {
    const workItem = wqdata.find((item) => item.id === workId);
    if (workItem) {
      workItem.claimantId = claimantId;
      workItem.status = 2;
    }
  });

  // Register Signal handler for completing work
  setHandler(completeWorkSignal, ({ workId }) => {
    const index = wqdata.findIndex((item) => item.id === workId);
    if (index !== -1) {
      wqdata.splice(index, 1);
    }
  });
  // ...
}
Run your Worker
Make sure your package.json file in the temporal-application project has a script to run the Worker:
{
  // ...
  "scripts": {
    "start": "ts-node src/index.ts"
  }
  // ...
}
Then from the root of the temporal-application project, run the Worker:
npm start
You can keep the Worker running in the background while you develop the Slack bot. If you make any changes to the Workflow code however, you will need to restart the Worker.
Step 4 -- Develop your Slack Bot
Now that you have the Work Queue Workflow in place, you can start building the interactive bot portion of the application.
Create Temporal Client module
First, you will need to create and export a Temporal Client in bot/modules/temporal-client.ts.
docs/tutorials/typescript/work-queue-slack-app/code/bot/modules/dev-temporal-client.ts
- TypeScript
- JavaScript
import "dotenv/config";
import {Client, Connection} from "@temporalio/client";

export let temporalClient: Client;

export async function initializeTemporalClient() {
  const connection = await Connection.connect();

  temporalClient = new Client({
    connection,
    namespace: process.env.TEMPORAL_DEV_NAMESPACE!,
  });
}
import "dotenv/config";
import { Client, Connection } from "@temporalio/client";

export let temporalClient;

export async function initializeTemporalClient() {
  const connection = await Connection.connect();

  temporalClient = new Client({
    connection,
    namespace: process.env.TEMPORAL_DEV_NAMESPACE,
  });
}
Initialize the Slack App
In the root of the bot project, create a file called slack_bot.ts and initialize the Slack bot, making sure to import and initialize the Temporal Client module:
docs/tutorials/typescript/work-queue-slack-app/code/bot/slack_bot.ts
- TypeScript
- JavaScript
import "dotenv/config";
import {
  App,
  // ...
} from "@slack/bolt";
import {initializeTemporalClient} from "./modules/dev-temporal-client";
// ...
// Initializes your app with your bot token, app token, and signing secret
const app = new App({
  token: process.env.SLACK_BOT_TOKEN!,
  signingSecret: process.env.SLACK_SIGNING_SECRET!,
  socketMode: true,
  appToken: process.env.SLACK_APP_TOKEN!,
});
// ...
// Register Slack bot error handler
app.error(async ({error}: {error: Error}) => {
  if (error instanceof Error) {
    console.error(`Error: ${error.name}, Message: ${error.message}`);
  } else {
    console.error("An unknown error occurred", error);
  }
});

// Start the app
(async () => {
  try {
    await app.start();
    await initializeTemporalClient();
    console.log("⚡️ Bolt app is running!");
  } catch (error) {
    console.error("Failed to start Bolt app:", error);
  }
})();
import "dotenv/config";
import { App,
// ...
 } from "@slack/bolt";
import { initializeTemporalClient } from "./modules/dev-temporal-client";
// ...
// Initializes your app with your bot token, app token, and signing secret
const app = new App({
  token: process.env.SLACK_BOT_TOKEN,
  signingSecret: process.env.SLACK_SIGNING_SECRET,
  socketMode: true,
  appToken: process.env.SLACK_APP_TOKEN,
});
// ...
// Register Slack bot error handler
app.error(async ({ error }) => {
  if (error instanceof Error) {
    console.error(`Error: ${error.name}, Message: ${error.message}`);
  }
  else {
    console.error("An unknown error occurred", error);
  }
});

// Start the app
(async () => {
  try {
    await app.start();
    await initializeTemporalClient();
    console.log("⚡️ Bolt app is running!");
  }
  catch (error) {
    console.error("Failed to start Bolt app:", error);
  }
})();
Handle workqueue Slash Command
Create a new file bot/modules/workqueue.ts.
This is where a majority of the Slack Command, work claiming, and work completing handling logic will live.
Here you will export a function that looks at the command text and decides what to do based on the text.
docs/tutorials/typescript/work-queue-slack-app/code/bot/modules/workqueue.ts
- TypeScript
- JavaScript
// ...
import {
  SayFn,
  RespondFn,
  SlackCommandMiddlewareArgs,
  // ...
} from "@slack/bolt";
import {WorkqueueData, WorkqueueStatus} from "../../common-types/types";
import {temporalClient} from "./dev-temporal-client";
// ...
import {WorkflowExecutionAlreadyStartedError} from "@temporalio/client";
// ...
// Handles and routes all incoming Work Queue Slash Commands
export async function handleWorkqueueCommand(
  command: SlackCommandMiddlewareArgs["command"],
  say: SayFn,
  respond: RespondFn
) {
  const commandText = command.text?.trim();

  if (commandText === "!delete") {
    await deleteWorkqueue(command, say);
  } else if (commandText === "") {
    await displayWorkQueue(command, respond);
  } else {
    await addWorkToQueue(command, say);
  }
  return;
}
// ...
// Handles and routes all incoming Work Queue Slash Commands
export async function handleWorkqueueCommand(command, say, respond) {
  const commandText = command.text?.trim();

  if (commandText === "!delete") {
    await deleteWorkqueue(command, say);
  }
  else if (commandText === "") {
    await displayWorkQueue(command, respond);
  }
  else {
    await addWorkToQueue(command, say);
  }
  return;
}
In the preceeding snippet you can see that the there are three possible ways to use the workqueue Slash Command.
workqueue !delete- This will delete the Work Queue for the channel. To achieve this you will need to send a Cancellation request to the Work Queue Workflow.workqueue- This will display the current Work Queue for the channel. To achieve this you will need to send a Query to the Work Queue Workflow.workqueue <work>- This will add a new work item to the Work Queue for the channel. To achieve this you will need to send a Signal to the Work Queue Workflow.
Send a Cancellation Request
You will want to have the functionality to delete a Work Queue for the channel. This is useful if you just want to start fresh with a new Work Queue, especially if you are testing out the App, because otherwise you will need to constantly visit the Temporal UI or use the Temporal CLI to terminate the Workflow.
To send a Cancellation Request, in the workqueue.ts module, define a function that uses the Temporal Client to get the handle of Workflow using the Workflow ID.
This Slack App assumes that the Slack channel name is unique and therefor can be used as the Workflow ID.
docs/tutorials/typescript/work-queue-slack-app/code/bot/modules/workqueue.ts
- TypeScript
- JavaScript
// ...
// Delete the Work Queue for the channel with a Cancellation Request
export async function deleteWorkqueue(
  command: SlackCommandMiddlewareArgs["command"],
  say: SayFn
): Promise<void> {
  const workflowId = command.channel_name;
  try {
    const handle = temporalClient.workflow.getHandle(workflowId);
    await handle.cancel();
    console.log(`Workflow with ID ${workflowId} has been cancelled.`);
    await reply(say, `Work Queue has been deleted for this channel.`);
  } catch (error) {
    console.error(`Failed to cancel workflow with ID ${workflowId}:`, error);
    await reply(say, `Failed to delete Work Queue for this channel.`);
  }
}
// ...
// Delete the Work Queue for the channel with a Cancellation Request
export async function deleteWorkqueue(command, say) {
  const workflowId = command.channel_name;
  try {
    const handle = temporalClient.workflow.getHandle(workflowId);
    await handle.cancel();
    console.log(`Workflow with ID ${workflowId} has been cancelled.`);
    await reply(say, `Work Queue has been deleted for this channel.`);
  }
  catch (error) {
    console.error(`Failed to cancel workflow with ID ${workflowId}:`, error);
    await reply(say, `Failed to delete Work Queue for this channel.`);
  }
}
By using the Slack channel name as the Workflow ID, you can tell which Workflow corresponds to which channel in the Temporal UI if you need to do any debugging.

Display the Work Queue
To display the Work Queue, first we need to ensure that a Work Queue exists for this channel. If one already exists you will get a "Workflow already started" error. If it does, then in this case you will just ignore the error and Query the Workflow.
Define three functions, displayWorkQueue, createNewWorkqueue, and queryWorkqueue in the workqueue.ts module.
docs/tutorials/typescript/work-queue-slack-app/code/bot/modules/workqueue.ts
- TypeScript
- JavaScript
// ...
// Display the Work Queue for the channel
// Creates a new Work Queue if it does not exist
async function displayWorkQueue(
  command: SlackCommandMiddlewareArgs["command"],
  respond: RespondFn
) {
  // Get the channel name in plain text
  const channelName = command.channel_name;
  // Create a new Work Queue for the channel
  await createNewWorkQueue(channelName);
  // If the Work Queue already exists, Query it
  const data = await queryWorkQueue(channelName, respond);
  await replyEphemeral(
    respond,
    "Work Queue cannot display",
    formatWorkqueueDataForSlack(channelName, data)
  );
}

// Create a new Work Queue for the channel if one does not exist
async function createNewWorkQueue(workflowid: string): Promise<void> {
  try {
    await temporalClient.workflow.start("workqueue", {
      taskQueue: `${process.env.ENV}-temporal-iq-task-queue`,
      workflowId: workflowid,
    });
  } catch (e) {
    if (e instanceof WorkflowExecutionAlreadyStartedError) {
      console.log("Workflow already started");
    } else {
      throw e;
    }
  }
}

// Read the state of the Work Queue for the channel using a Query
async function queryWorkQueue(
  workflowId: string,
  say: SayFn
): Promise<WorkqueueData[]> {
  try {
    const handle = temporalClient.workflow.getHandle(workflowId);
    const result = await handle.query<WorkqueueData[]>(getWorkqueueDataQuery);
    console.log("Current workqueue data:", result);
    return result;
  } catch (error) {
    console.error("Error querying workqueue data:", error);
    await say("An error occurred while Querying the Work Queue.");
    return [];
  }
}
// ...
// Display the Work Queue for the channel
// Creates a new Work Queue if it does not exist
async function displayWorkQueue(command, respond) {
  // Get the channel name in plain text
  const channelName = command.channel_name;
  // Create a new Work Queue for the channel
  await createNewWorkQueue(channelName);
  // If the Work Queue already exists, Query it
  const data = await queryWorkQueue(channelName, respond);
  await replyEphemeral(respond, "Work Queue cannot display", formatWorkqueueDataForSlack(channelName, data));
}

// Create a new Work Queue for the channel if one does not exist
async function createNewWorkQueue(workflowid) {
  try {
    await temporalClient.workflow.start("workqueue", {
      taskQueue: `${process.env.ENV}-temporal-iq-task-queue`,
      workflowId: workflowid,
    });
  }
  catch (e) {
    if (e instanceof WorkflowExecutionAlreadyStartedError) {
      console.log("Workflow already started");
    }
    else {
      throw e;
    }
  }
}

// Read the state of the Work Queue for the channel using a Query
async function queryWorkQueue(workflowId, say) {
  try {
    const handle = temporalClient.workflow.getHandle(workflowId);
    const result = await handle.query(getWorkqueueDataQuery);
    console.log("Current workqueue data:", result);
    return result;
  }
  catch (error) {
    console.error("Error querying workqueue data:", error);
    await say("An error occurred while Querying the Work Queue.");
    return [];
  }
}
In the preceding snippet, the createNewWorkqueue function attempts to start a new Work Queue Workflow.
If there is a Workflow already running for the channel, it will catch the WorkflowExecutionAlreadyStartedError, but ignore it and continue.
The queryWorkqueue function then sends a Query to the Work Queue Workflow for the channel and returns the data.
This pattern reduces the need to explictly check if a Workflow exists before sending the Query.
Add work to the Work Queue
To add work to the Work Queue, define a function addWorkToQueue in the workqueue.ts module.
This function needs to build the Work Item data object and call another function to actually send the Signal to the Workflow.
Click the link below to visit the source code to see the full code implementation for building the Work Item data object.
docs/tutorials/typescript/work-queue-slack-app/code/bot/modules/workqueue.ts
- TypeScript
- JavaScript
// ...
// Add work to the queue using a Signal
async function addWorkToQueue(
  command: SlackCommandMiddlewareArgs["command"],
  say: SayFn
) {
  // Get the channel name in plain text
  const channelId = command.channel_id;
  const channelName = command.channel_name;
  const wqdata = buildWQData(command, channelId, channelName);
  await signalAddWork(wqdata, say);
  // Reply to the message directly in the thread
  await reply(say, `Added Work ${wqdata.id} to the Queue.`);
}
// ...
async function signalAddWork(params: WorkqueueData, say: SayFn): Promise<void> {
  try {
    await temporalClient.workflow.signalWithStart("workqueue", {
      workflowId: params.channelName,
      taskQueue: `${process.env.ENV}-temporal-iq-task-queue`,
      signal: addWorkToQueueSignal,
      signalArgs: [params],
    });
  } catch (error) {
    console.error("Error signaling workqueue data:", error);
    await say("An error occurred while Signaling the Work Queue.");
  }
}
// ...
// Add work to the queue using a Signal
async function addWorkToQueue(command, say) {
  // Get the channel name in plain text
  const channelId = command.channel_id;
  const channelName = command.channel_name;
  const wqdata = buildWQData(command, channelId, channelName);
  await signalAddWork(wqdata, say);
  // Reply to the message directly in the thread
  await reply(say, `Added Work ${wqdata.id} to the Queue.`);
}
// ...
async function signalAddWork(params, say) {
  try {
    await temporalClient.workflow.signalWithStart("workqueue", {
      workflowId: params.channelName,
      taskQueue: `${process.env.ENV}-temporal-iq-task-queue`,
      signal: addWorkToQueueSignal,
      signalArgs: [params],
    });
  }
  catch (error) {
    console.error("Error signaling workqueue data:", error);
    await say("An error occurred while Signaling the Work Queue.");
  }
}
The key part of this functionality is using the Temporal Client's signalWithStart API.
This API enables you to start the Workflow if it doesn't exist and then send the Signal with Work Item data.
Essentially, this one API makes it so you don't have to check whether the Workflow exists before sending the Signal.
Claim a work item
In the slack_bot.ts file, you will need to add a listener for the wq_complete button click event.
docs/tutorials/typescript/work-queue-slack-app/code/bot/slack_bot.ts
- TypeScript
- JavaScript
// ...
import {
  // ...
  signalClaimWork,
  // ...
} from "./modules/workqueue";
// ...
// Listen for Work Item Claim
app.action<BlockAction<BlockElementAction>>(
  "wq_claim",
  async ({ack, say, body}) => {
    await ack();
    // Ensure the body.actions[0] is a ButtonAction
    const action = body.actions[0] as ButtonAction;
    if (action.value) {
      const [channelName, workId, userId] = action.value.split("_");
      const claimantId = body.user.id;
      // Send signal to the Temporal workflow to claim the work
      await signalClaimWork(channelName, workId, claimantId, userId, say);
    } else {
      console.error("Action value is undefined.");
    }
  }
);
// ...
import {
// ...
signalClaimWork,
// ...
 } from "./modules/workqueue";
// ...
// Listen for Work Item Claim
app.action("wq_claim", async ({ ack, say, body }) => {
  await ack();
  // Ensure the body.actions[0] is a ButtonAction
  const action = body.actions[0];
  if (action.value) {
    const [channelName, workId, userId] = action.value.split("_");
    const claimantId = body.user.id;
    // Send signal to the Temporal workflow to claim the work
    await signalClaimWork(channelName, workId, claimantId, userId, say);
  }
  else {
    console.error("Action value is undefined.");
  }
});
Then, in workqueue.ts module, define a function claimWork that sends a Signal to the Work Queue Workflow to claim the work item.
docs/tutorials/typescript/work-queue-slack-app/code/bot/modules/workqueue.ts
- TypeScript
- JavaScript
// ...
export async function signalClaimWork(
  channelName: string,
  workId: string,
  claimantId: string,
  userId: string,
  say: SayFn
) {
  try {
    const handle = temporalClient.workflow.getHandle(channelName);
    await handle.signal(claimWorkSignal, {workId, claimantId});
    console.log(`Work item ${workId} claimed by ${claimantId}`);
    await reply(
      say,
      `<@${userId}> Work item ${workId} claimed by <@${claimantId}>.`
    );
  } catch (error) {
    console.error("Failed to signal claim work:", error);
  }
}
// ...
export async function signalClaimWork(channelName, workId, claimantId, userId, say) {
  try {
    const handle = temporalClient.workflow.getHandle(channelName);
    await handle.signal(claimWorkSignal, { workId, claimantId });
    console.log(`Work item ${workId} claimed by ${claimantId}`);
    await reply(say, `<@${userId}> Work item ${workId} claimed by <@${claimantId}>.`);
  }
  catch (error) {
    console.error("Failed to signal claim work:", error);
  }
}
Mark work item complete
In the slack_bot.ts file, you will need to add a listener for thewq_claim button click event.
docs/tutorials/typescript/work-queue-slack-app/code/bot/slack_bot.ts
- TypeScript
- JavaScript
// ...
import {
  // ...
  signalCompleteWork,
} from "./modules/workqueue";
// ...
// Listen for Work Item Completion
app.action<BlockAction<BlockElementAction>>(
  "wq_complete",
  async ({ack, say, body}) => {
    await ack();
    const action = body.actions[0] as ButtonAction;
    if (action.value) {
      const [channelName, workId, userId] = action.value.split("_");
      const message = body.message as GenericMessageEvent;
      // Send signal to the Temporal workflow to complete the work
      await signalCompleteWork(channelName, workId, message, userId, say);
    } else {
      console.error("Action value is undefined.");
    }
  }
);
// ...
import {
// ...
signalCompleteWork, } from "./modules/workqueue";
// ...
// Listen for Work Item Completion
app.action("wq_complete", async ({ ack, say, body }) => {
  await ack();
  const action = body.actions[0];
  if (action.value) {
    const [channelName, workId, userId] = action.value.split("_");
    const message = body.message;
    // Send signal to the Temporal workflow to complete the work
    await signalCompleteWork(channelName, workId, message, userId, say);
  }
  else {
    console.error("Action value is undefined.");
  }
});
Then, in the workqueue.ts module, define a function completeWork that sends a Signal to the Work Queue Workflow to mark the work item as complete.
docs/tutorials/typescript/work-queue-slack-app/code/bot/modules/workqueue.ts
- TypeScript
- JavaScript
// ...
export async function signalCompleteWork(
  channelId: string,
  workId: string,
  message: GenericMessageEvent,
  userId: string,
  say: SayFn
) {
  try {
    const handle = temporalClient.workflow.getHandle(channelId);
    await handle.signal(completeWorkSignal, {workId});
    console.log(`Work item ${workId} marked as complete`);
    await reply(say, `<@${userId}> Work item ${workId} marked as complete.`);
  } catch (error) {
    console.error("Failed to signal complete work:", error);
  }
}
// ...
export async function signalCompleteWork(channelId, workId, message, userId, say) {
  try {
    const handle = temporalClient.workflow.getHandle(channelId);
    await handle.signal(completeWorkSignal, { workId });
    console.log(`Work item ${workId} marked as complete`);
    await reply(say, `<@${userId}> Work item ${workId} marked as complete.`);
  }
  catch (error) {
    console.error("Failed to signal complete work:", error);
  }
}
Run the Slack bot
Make sure your package.json file in the bot project has a script to run the Slack bot:
{
  // ...
  "scripts": {
    "start": "ts-node src/slack_bot.ts"
  }
  // ...
}
Then from the root of the bot project, run the Slack bot:
npm start
Once running the bot will be listening for the workqueue Slash Command and the wq_claim and wq_complete button click events in your Slack workspace.
Step 5 (Optional) -- Test the Workflow with Jest framework
To test your Work Queue Workflow, create workqueue.test.ts in the temporal-application/src/__tests__ directory.
Ensure you have the following devDependencies in your package.json:
{
  // ...
  "devDependencies": {
    "@temporalio/client": "^1.10.1",
    "@temporalio/nyc-test-coverage": "^1.10.1",
    "@temporalio/testing": "^1.10.1",
    "@types/jest": "^29.5.12",
    "@types/node": "^20.14.2",
    "jest": "^29.7.0",
    "ts-jest": "^29.1.4",
    "ts-node": "^10.9.2",
    "typescript": "^5.4.5"
    // Any other packages needed for testing logic
  }
  // ...
}
The Temporal TypeScript SDK comes equipped with a Test Suite and a pattern for testing Workflows.
Set up the Test Suite like this:
docs/tutorials/typescript/work-queue-slack-app/code/temporal-application/src/tests/workqueue.test.ts
- TypeScript
- JavaScript
import {TestWorkflowEnvironment} from "@temporalio/testing";
import {WorkflowCoverage} from "@temporalio/nyc-test-coverage";
import {Worker, Runtime, DefaultLogger} from "@temporalio/worker";
// ...
describe("Work Queue Workflow", () => {
  let testEnv: TestWorkflowEnvironment;
  const workflowCoverage = new WorkflowCoverage();

  beforeAll(async () => {
    Runtime.install({logger: new DefaultLogger("WARN")});
    testEnv = await TestWorkflowEnvironment.createLocal();
  });

  afterAll(async () => {
    await testEnv?.teardown();
  });

  afterAll(() => {
    workflowCoverage.mergeIntoGlobalCoverage();
  });
  // ...
});
import { TestWorkflowEnvironment } from "@temporalio/testing";
import { WorkflowCoverage } from "@temporalio/nyc-test-coverage";
import { Runtime, DefaultLogger } from "@temporalio/worker";
// ...
describe("Work Queue Workflow", () => {
  let testEnv;
  const workflowCoverage = new WorkflowCoverage();

  beforeAll(async () => {
    Runtime.install({ logger: new DefaultLogger("WARN") });
    testEnv = await TestWorkflowEnvironment.createLocal();
  });

  afterAll(async () => {
    await testEnv?.teardown();
  });

  afterAll(() => {
    workflowCoverage.mergeIntoGlobalCoverage();
  });
  // ...
});
You can test for many scenarios. For example, you could test for the following:
- Adding work to the queue
- Claiming work in the queue
- Completing work in the queue
- Continuing-As-New when event count is high
The basic pattern to test adding work to the Work Queue looks like this:
docs/tutorials/typescript/work-queue-slack-app/code/temporal-application/src/tests/workqueue.test.ts
- TypeScript
- JavaScript
// ...
test("should add work to the queue", async () => {
  // Get a test environment Temporal Client
  const {client, nativeConnection} = testEnv;
  // Create a test environment Worker
  const worker = await Worker.create(
    workflowCoverage.augmentWorkerOptions({
      connection: nativeConnection,
      taskQueue: "test",
      workflowsPath: require.resolve("../workflows"),
    })
  );
  // ...
  // Run the Worker
  await worker.runUntil(async () => {
    const handle = await client.workflow.start(workqueue, {
      args: [],
      workflowId: workflowId,
      taskQueue: "test",
    });
    const workItem: WorkqueueData = {
      // ...
    };
    // Add work to the queue
    await handle.signal(addWorkToQueueSignal, workItem);
    // Check to see if the data is there
    const result = await handle.query(getWorkqueueDataQuery);
    // Compare the data
    expect(result).toContainEqual(workItem);
  });
});
// ...
test("should add work to the queue", async () => {
  // Get a test environment Temporal Client
  const { client, nativeConnection } = testEnv;
  // Create a test environment Worker
  const worker = await Worker.create(workflowCoverage.augmentWorkerOptions({
    connection: nativeConnection,
    taskQueue: "test",
    workflowsPath: require.resolve("../workflows"),
  }));
  // ...
  // Run the Worker
  await worker.runUntil(async () => {
    const handle = await client.workflow.start(workqueue, {
      args: [],
      workflowId: workflowId,
      taskQueue: "test",
    });
    const workItem = {
    // ...
    };
    // Add work to the queue
    await handle.signal(addWorkToQueueSignal, workItem);
    // Check to see if the data is there
    const result = await handle.query(getWorkqueueDataQuery);
    // Compare the data
    expect(result).toContainEqual(workItem);
  });
});
For more test examples, see the Work Queue Workflow test file by clicking the link above the preceeding code snippet.
Conclusion
In this tutorial, you learned how to build a Slack App that uses Temporal to manage a Work Queue. You learned how to create a Work Queue Workflow, send Signals and Queries to the Workflow, and how to test the Workflow. You also learned how to build a Slack bot that interacts with the Work Queue Workflow using the Temporal Client.
This Slack App is a great example of how you can use Temporal as a backend for your application.
If you want to deploy your TypeScript application to Digital Ocean, see the Deploy your TypeScript application to Digital Ocean tutorial for more information.